Carrot Chocolate Covered Strawberries
Table of Contents
Growing up, my kitchen was a haven of warm aromas and joyful laughter, a place where even the simplest ingredients could transform into something magical. One of my fondest memories is recreating holiday-inspired treats with my grandmother, who always knew how to turn everyday fruits into festive delights. That’s the spirit I’ve tried to capture with these Carrot Chocolate Covered Strawberries. Imagine the whimsical fun of Easter morning bundled in a bite-sized treat that’s not only visually delightful but also a cinch to make. These little treasures embody the joy of creating homemade desserts that bring smiles to both young and old, making them perfect for any occasion. They’re a playful nod to nostalgia, reminding us of simpler times, when the kitchen was the heart of the home.
What makes these Carrot Chocolate Covered Strawberries truly special is the way they combine the juicy sweetness of strawberries with the smooth, rich taste of orange-flavored chocolate. This delightful duo is not only visually appealing, capturing the bright, cheerful colors of spring, but they also carry the comforting promise of a homemade treat that’s as easy to make as it is to eat. Whether you’re looking to surprise your little ones with a fun, edible craft or you want to add a touch of whimsy to your Easter dessert table, these strawberries are your go-to. Plus, the process of dipping and decorating is as enjoyable as the end result, offering a calming kitchen activity that can be shared with family and friends, creating new traditions and cherished memories.
Why This Recipe Should Be on Your Table
These Carrot Chocolate Covered Strawberries bring a unique twist to traditional desserts, making them a delightful addition to any gathering or a special treat for yourself. Here’s why they deserve a spot on your table:
- Simple Ingredients: With just strawberries and chocolate melts, you have everything you need to create this magical treat. The simplicity of the ingredients means that you can focus more on the process and the joy of crafting something beautiful. You don’t need an extensive shopping list, making it an ideal project for impromptu gatherings or a spontaneous afternoon of fun in the kitchen.
- Quick to Prepare: These strawberries take minimal time to make, perfect for those last-minute dessert ideas. In under half an hour, you’ll have a tray of delightful sweets ready to impress. This quick preparation means more time to enjoy with friends and family, and less time worrying about dessert details.
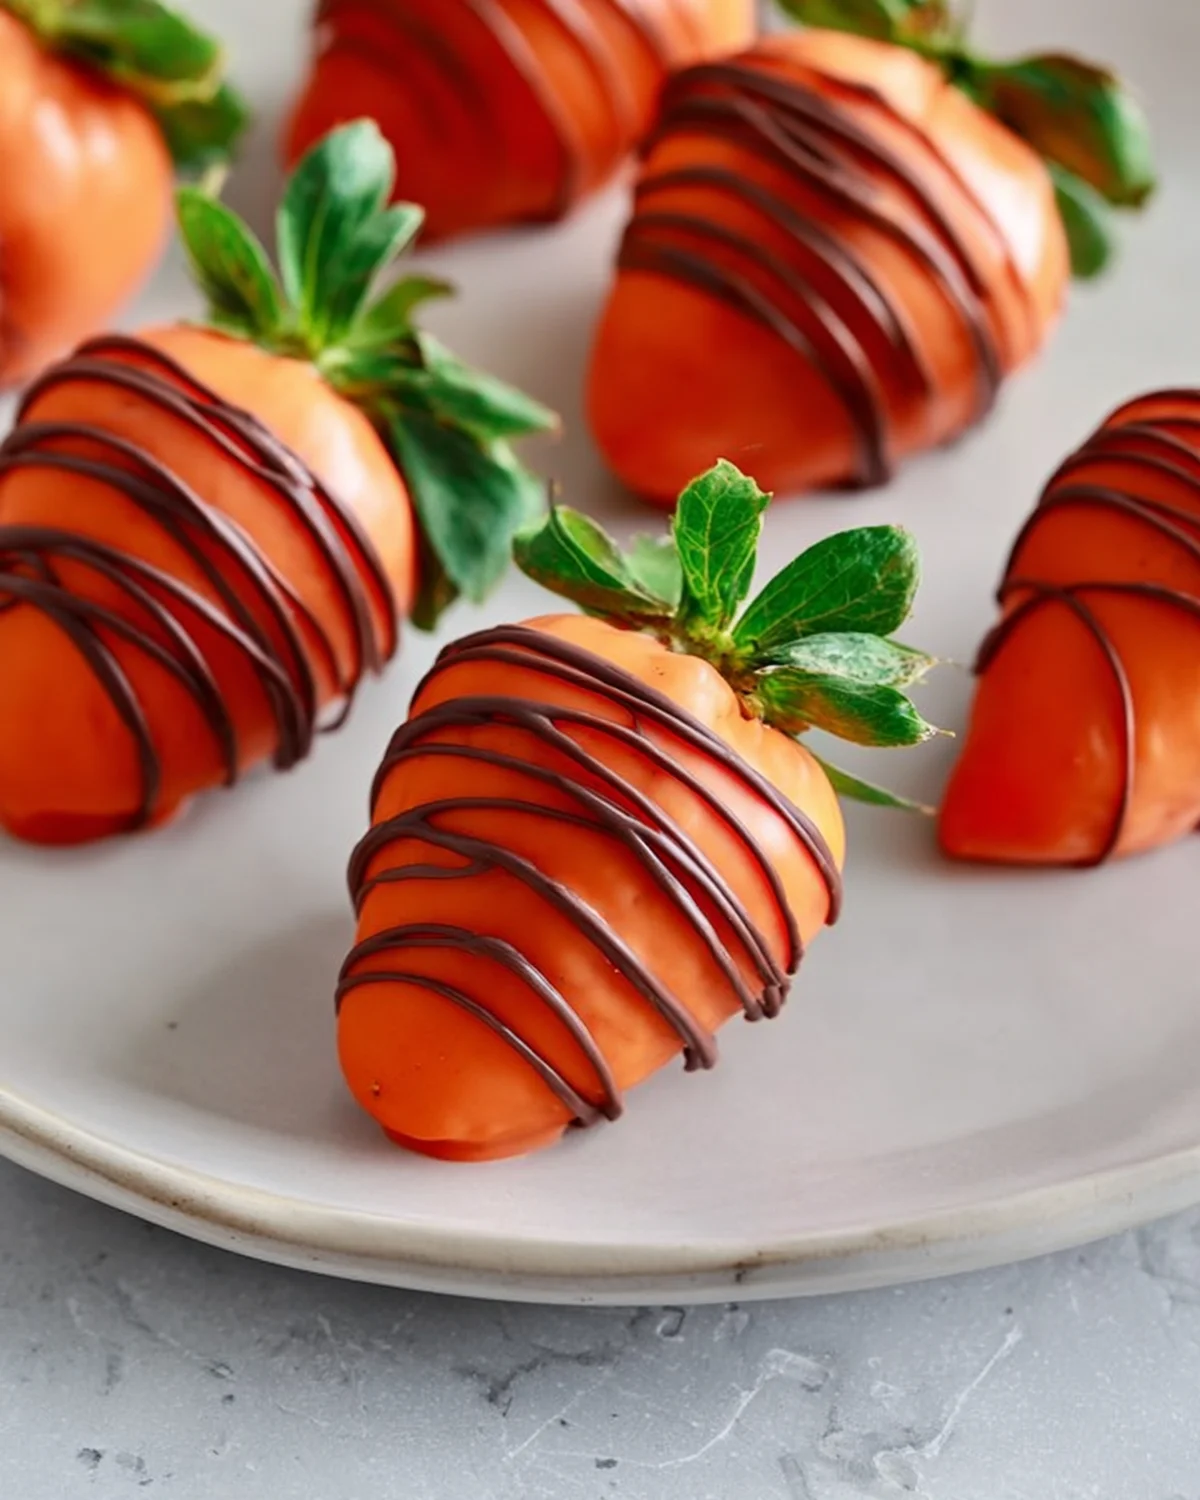
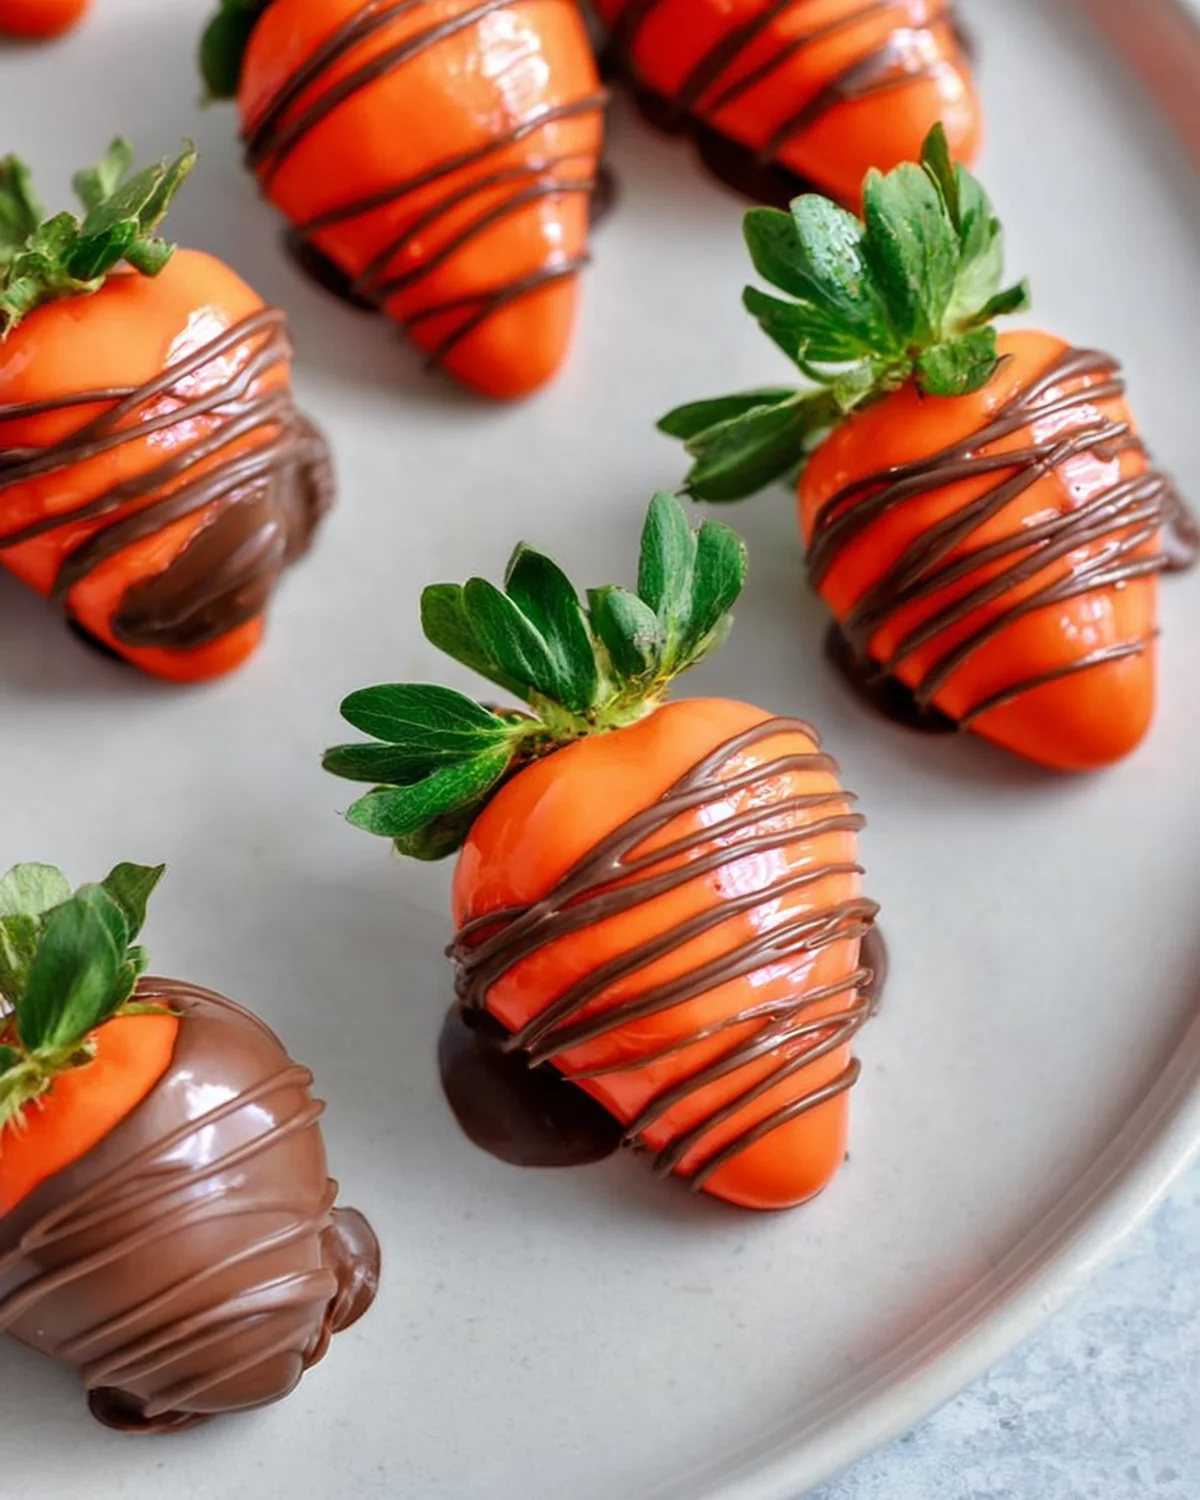
- Visually Appealing: Their bright orange color and playful carrot shape make them a stunning centerpiece for any occasion. These strawberries are a feast for the eyes as much as they are for the palate. Their vibrant hue can brighten up any table, making them an excellent choice for spring celebrations.
- Family-Friendly Activity: Involve your kids in the dipping and decorating process for some fun, quality time together. This recipe is a wonderful way to introduce children to the joys of cooking, allowing them to express their creativity. The hands-on nature of this recipe is perfect for building confidence in the kitchen and fostering a love for homemade treats.
- Versatile Treat: Perfect for any holiday, especially Easter, but equally charming for a spring brunch or garden party. Their adaptability means you can serve them at various events, from casual gatherings to more formal celebrations. Whether paired with tea at a garden party or presented at a festive Easter brunch, these strawberries are sure to delight.
Kitchen Tools to Make This Recipe Easy Peasy
To whip up these delightful bites, you won’t need much — just a few trusty kitchen tools, much like the ones my grandma used when teaching me the joy of homemade snacks:
- Microwave-Proof Bowl: Essential for melting the chocolate smoothly and evenly. Make sure to use a bowl that’s large enough to allow for easy stirring and dipping. A microwave-proof bowl ensures that your chocolate melts consistently without burning, offering a smooth coating for your strawberries.
- Paper Towels: For drying the strawberries completely, ensuring the chocolate adheres properly. Any moisture left on the strawberries can prevent the chocolate from sticking well. Thoroughly drying your strawberries is a crucial step in achieving a flawless finished product.
- Wax Paper: Provides a non-stick surface for your chocolate-dipped strawberries to dry. This ensures easy removal once the chocolate has set. Wax paper is an invaluable tool in this recipe, preventing your creations from sticking and breaking.
- Candy Squeeze Tube: Helps in creating the carrot-like design on the strawberries. A zip-tight bag with a small snip in the corner works too, offering a DIY option that’s both convenient and effective. The squeeze tube or bag gives you control over the decorative details, allowing for precise, artistic touches.
How to Make This Recipe Easy Peasy
Ingredients
- 2 lbs. of Strawberries rinsed and dried with a paper towel
- 1 (12 oz.) bag of Orange Chocolate Melts – Wilton is my preferred brand
- Wax paper
- Candy squeeze tube
you can substitute a zip-tight bag with a small snip in the corner
Instructions
- Melt the chocolate melts in a microwave-proof bowl for 1 minute, stirring until smooth. If needed, microwave for another 30 seconds and stir again. Be cautious not to overheat the chocolate, as it can seize and lose its smooth texture. Melting chocolate requires patience—short bursts in the microwave with frequent stirring help maintain its silky consistency.
- Ensure strawberries are completely dry using a paper towel. Drying them thoroughly is crucial for the chocolate to adhere properly. This step is vital, as any moisture can cause the chocolate to slip off or not set properly.
- Set out a piece of wax paper onto your work surface. This will be where your strawberries rest to set. Wax paper acts as a perfect drying surface, preventing the chocolate from sticking and making cleanup a breeze.
- Dip strawberries into the melted chocolate, spinning to coat completely. A gentle rolling motion will ensure an even coat. Take care to cover each strawberry evenly, allowing the excess chocolate to drip back into the bowl for a smooth finish.
- Hold the strawberry over the bowl to let excess chocolate drip off, then place on wax paper to dry. This helps in avoiding a thick, uneven layer of chocolate. Proper dripping ensures a uniform layer of chocolate around each berry.
- Fill your squeeze tube with melted chocolate. Reheat chocolate for 30 seconds if needed. Ensure the chocolate is fluid enough to create fine lines for decoration. The decoration is where you can personalize each piece, adding intricate details or keeping it simple.
- Use the squeeze bottle to create a zigzag pattern over the strawberries. This step is where you can really let your creativity shine. Experiment with different patterns and thicknesses, tailoring each strawberry to your aesthetic preference.
- Let the strawberries air dry to harden. This should take about 10-15 minutes at room temperature. Allowing the chocolate to set at room temperature ensures a glossy finish and a satisfying snap when bitten into.
Difficulty: Easy • Cuisine: American • Preparation Time: 15 minutes • Cooking Time: 0 minutes • Total Time: 30 minutes • Calories: 150 • Servings: 12
Note: For a varied look, you can dip some strawberries partially, leaving some red at the top for a different aesthetic. This adds a charming contrast and visual interest to your dessert presentation. Experimenting with coverage allows individual creativity to shine, offering a bespoke appearance to each treat.

Health and Flavor Benefits of Ingredients
These Carrot Chocolate Covered Strawberries not only promise delightful flavors but also come with some surprising benefits:
- Strawberries: Packed with vitamin C and antioxidants, strawberries boost your immune system while satisfying your sweet tooth. They are also low in calories, making them a guilt-free indulgence. The natural sweetness and juicy texture of strawberries provide a perfect base for the rich chocolate coating.
- Orange Chocolate Melts: While primarily for flavor, they offer a smooth, creamy texture that complements the tartness of strawberries. The orange flavor adds a refreshing twist, enhancing the overall taste experience. The subtle citrus notes of the chocolate provide a refreshing contrast to the sweetness of the strawberries, making each bite an adventure in flavor.
Tasty Pairings to Serve with This Easy Peasy Dish
These strawberries are versatile companions to various beverages and dishes, making them perfect for any occasion:
- Champagne: The bubbles and acidity of champagne beautifully complement the sweetness of the strawberries. It’s a classic pairing that’s sure to impress your guests. The effervescence of champagne contrasts delightfully with the smooth chocolate, creating a luxurious experience.
- Vanilla Ice Cream: Serve alongside for a delightful contrast of warm and cold textures. The creamy vanilla acts as a perfect backdrop to the fruity and chocolaty notes. The combination of rich chocolate, fresh strawberries, and creamy ice cream creates a dessert that’s both satisfying and refreshing.
- Cheese Platter: Add these to a cheese platter for a sweet and savory mix, perfect for entertaining. The combination of flavors and textures will keep your guests coming back for more. The sweetness of the strawberries balances the savory richness of cheeses, offering a sophisticated touch to your spread.
Storage Tips and How to Enjoy Leftovers the Easy Peasy Way
If you have any leftovers, simply store them in an airtight container in the refrigerator for up to two days. When you’re ready to enjoy them again, let them sit at room temperature for a few minutes to soften the chocolate. This will bring back the perfect texture and flavor balance. Proper storage ensures that the chocolate remains crisp and the strawberries stay fresh.
These strawberries also make delightful toppings for a bowl of yogurt or a slice of cake, adding a burst of freshness and color to your desserts. You can also chop them up and mix them into a salad for an unexpected twist or use them to top a bowl of oatmeal for a breakfast treat that feels indulgent yet healthy. Incorporating them into other dishes allows you to enjoy their vibrant flavor in new and exciting ways.
As we wrap up this culinary journey, I hope these Carrot Chocolate Covered Strawberries bring as much joy to your table as they do to mine. In the heart of every homemade creation lies a story of love, warmth, and the simple pleasure of sharing something sweet with those we cherish. Remember, the magic of cooking at home isn’t just in the flavors you create, but in the memories you craft along the way. Happy cooking, my dear friends, and may your kitchen always be filled with laughter and delicious aromas.
Pin this Easy Peasy recipe!
Love this recipe? Pin the image below to your favorite Pinterest boards and bring a little Easy Peasy comfort to your kitchen whenever you need it.


Carrot Chocolate Covered Strawberries
Ingredients
Equipment
Method
- Melt the chocolate melts in a microwave-proof bowl for 1 minute, stir until smooth. If necessary, microwave for 30 more seconds and stir until smooth.
- Ensure strawberries are thoroughly dried using paper towels.
- Set out a piece of wax paper onto the work surface.
- Dip strawberries into the chocolate melts, spinning to coat completely. Hold over bowl to allow excess chocolate to drip off.
- Place coated strawberries on wax paper to dry.
- Fill squeeze tube with melted chocolate. Reheat chocolate if needed for 30 seconds, then pour into squeeze tube.
- Use the squeeze bottle to drizzle chocolate over strawberries, moving from top to bottom or vice versa.
- Let the strawberries air dry to harden.