Bunny Butt Oreo Balls – A Cute and Easy Easter Treat
Table of Contents
Easter morning at our house has always meant a delightful mix of pastel colors, sweet treats, and the joyous sound of children giggling as they search for hidden treasures. One of my fondest memories is the smell of freshly baked goodies mingling with the soft sunlight filtering through our kitchen windows, my children’s eyes wide with anticipation. With each passing year, we’ve created a new treat to cherish, and these Bunny Butt Oreo Balls have quickly hopped into our hearts as a family favorite.
These adorable little bites are not just about the cute factor—though that’s certainly a big part of their charm. They’re a sweet reminder that the best moments are often the simplest ones, made with love and shared with family. The process of rolling and decorating these Oreo balls becomes a joyful activity, perfect for little helping hands eager to add their creative touch. And of course, who can resist the combination of creamy, chocolatey goodness with a hint of coconut, bringing a playful twist to the traditional holiday sweets?
As you gather with family and friends, these Bunny Butt Oreo Balls offer more than just a treat; they’re a conversation starter, a nostalgic nod to childhood Easters filled with laughter and warmth. Let’s dive into why they deserve a special place on your Easter table.
Why This Recipe Should Be on Your Table
These Bunny Butt Oreo Balls bring a unique twist to traditional desserts, making them a delightful addition to any gathering or a special treat for yourself. Here’s why they deserve a spot on your table:
- Adorable Presentation: These treats are irresistibly cute and perfect for Easter celebrations, bringing smiles to both kids and adults alike. Their whimsical design makes them a centerpiece of any dessert table. Imagine the delight on your guests’ faces as they admire these charming confections before indulging.
- Easy to Make: With just a handful of ingredients, these no-bake treats are straightforward and suitable for cooks of all skill levels. They require minimal preparation, making them perfect for busy holiday schedules. Plus, no need to worry about oven mishaps—a true stress-reliever!
- Interactive Fun: Creating these bunny-shaped delights can be a fun family activity, encouraging creativity and bonding in the kitchen. Kids will love shaping the balls and decorating them with bunny features. It’s a fantastic way to get everyone involved, turning cooking into a delightful family tradition.
- Deliciously Versatile: With a combination of Oreos, cream cheese, and white chocolate, these treats offer a delicious blend of flavors that everyone will love. They’re adaptable to different tastes, with options to customize toppings and decorations. Whether you prefer a touch of coconut or a sprinkle of colorful sugar, the possibilities are endless.
Kitchen Tools to Make This Recipe Easy Peasy
To whip up these delightful bites, you won’t need much — just a few trusty kitchen tools, much like the ones my grandma used when teaching me the joy of homemade snacks:
- Food Processor: For crushing the Oreos into fine crumbs, making the perfect base for your Oreo balls. If you don’t have one, a ziplock bag and rolling pin work as a great alternative. This method also doubles as a stress-relief technique—smash away those pre-holiday jitters!
- Mixing Bowl: To combine the cream cheese and Oreo crumbs into a smooth dough. A sturdy spatula or wooden spoon will help achieve a well-incorporated mixture. The tactile joy of mixing by hand can also be a therapeutic experience.
- Microwave-Safe Bowl: Essential for melting the white chocolate or candy melts until silky smooth. Ensure it’s deep enough for easy dipping. A glass bowl is a great choice as it retains heat, keeping your chocolate melted longer.
- Parchment Paper: Keeps your workspace clean and prevents the Oreo balls from sticking as they set. It’s also great for transferring the balls to the fridge or freezer. The non-stick surface is a lifesaver when it comes to cleanup.
- Fork or Dipping Tool: Helpful for dipping each Oreo ball into melted chocolate with ease. A toothpick can also be used for more precise control. Mastering the art of dipping can turn you into a chocolate-coating pro!
How to Make This Recipe Easy Peasy
Ingredients
- 1 (14 oz) package Oreo cookies, finely crushed
- 8 oz cream cheese, softened
- 12 oz white chocolate or white candy melts, melted
- ½ cup shredded coconut (for a fluffy tail effect, optional)
- Mini marshmallows or candy pearls (for the bunny tail)
- Pink candy melts or pink sprinkles (for bunny feet details)
- Small white chocolate chips (for foot decoration, optional)
Instructions
- Place Oreos (including filling) into a food processor and pulse until fine crumbs form. This creates a uniform texture for the dough. The finer the crumbs, the smoother your bunny butts will look and feel.
- Add softened cream cheese and mix until it forms a thick, sticky dough. The cream cheese should be at room temperature for easy blending. Softened cream cheese ensures a lump-free, creamy mixture.
- Scoop about 1 tablespoon of the mixture and roll into smooth balls. Use your hands to ensure they are compact and even. Encourage the kids to join in; they love rolling these tiny, chocolatey spheres.
- Place on a parchment-lined baking sheet. Chill in the freezer for 15–20 minutes to firm up. This step makes the dipping process smoother. Chilling helps the balls hold their shape during the coating process.
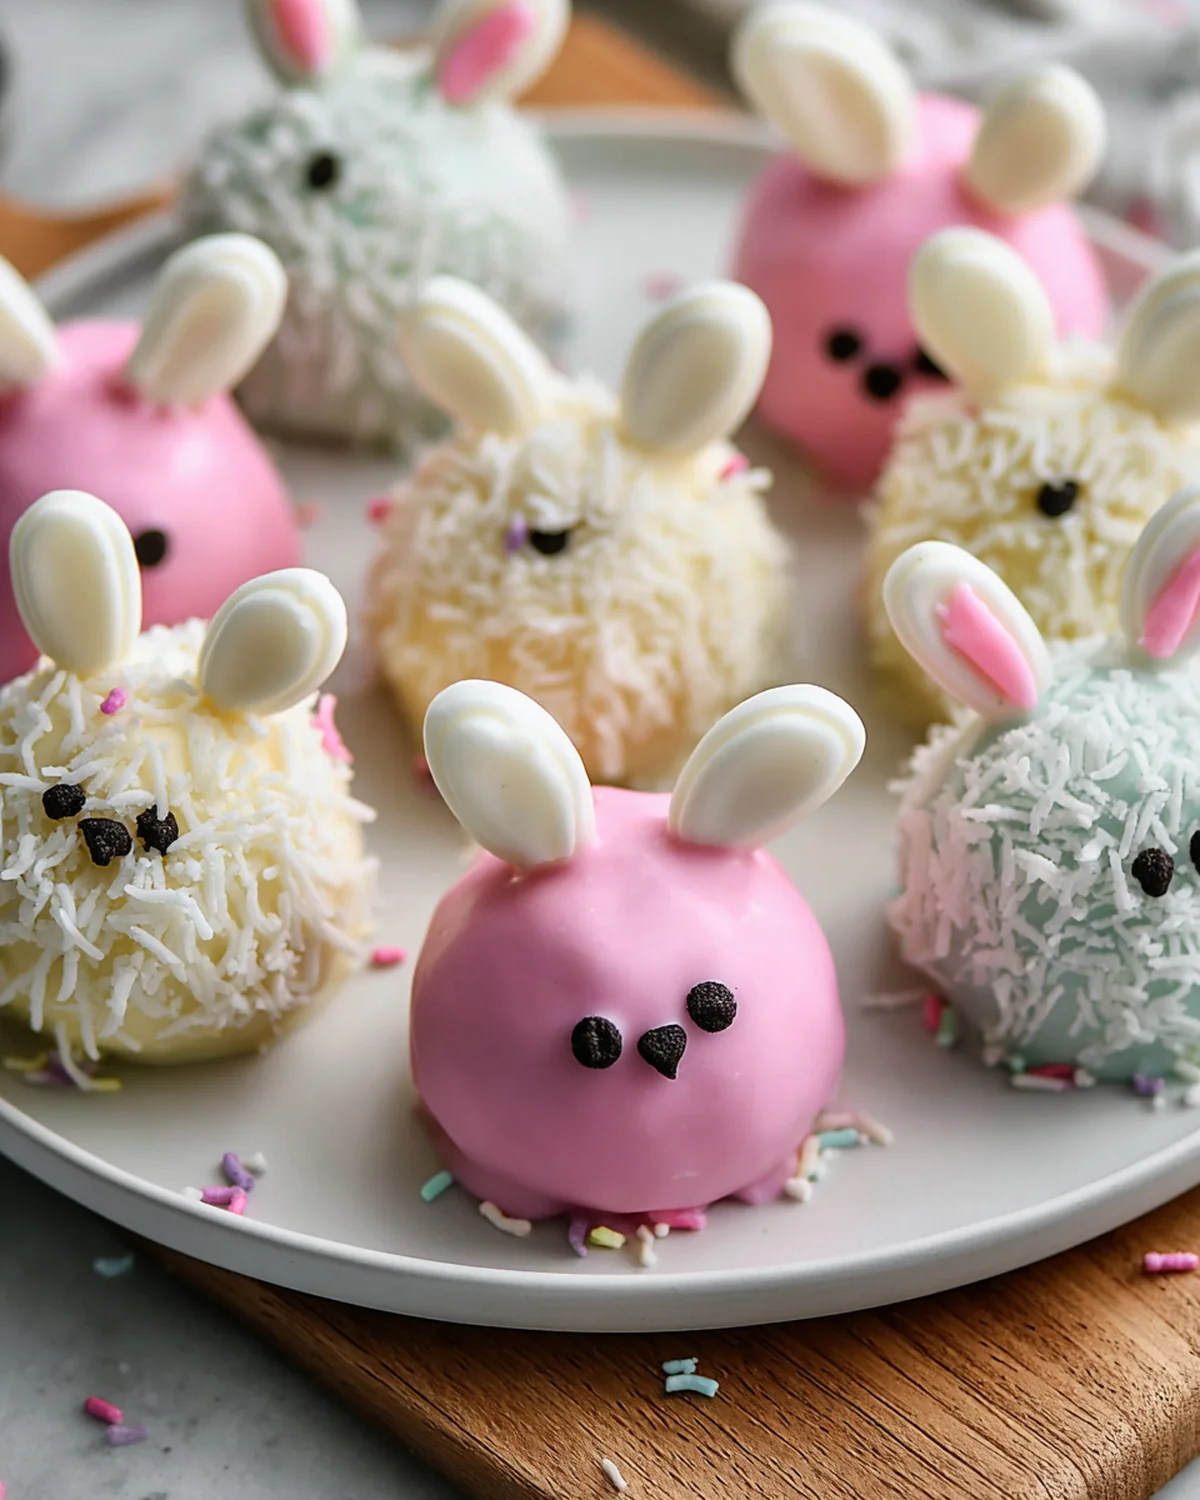
- Melt white chocolate or candy melts in a microwave-safe bowl in 30-second intervals, stirring between each, until smooth. Be careful not to overheat, as this can cause the chocolate to seize. A microwave with a turntable ensures even heating.
- If the chocolate is too thick, add 1 teaspoon coconut oil or vegetable shortening to thin it out. This helps achieve a glossy coating. A smooth, flowing chocolate makes for a more even, professional-looking coating.
- Using a fork or dipping tool, dip each chilled Oreo ball into the melted white chocolate. Tap off excess chocolate and place back onto the parchment-lined baking sheet. A slight shaking motion helps remove extra chocolate. Practice makes perfect; your dipping technique will improve with each ball!
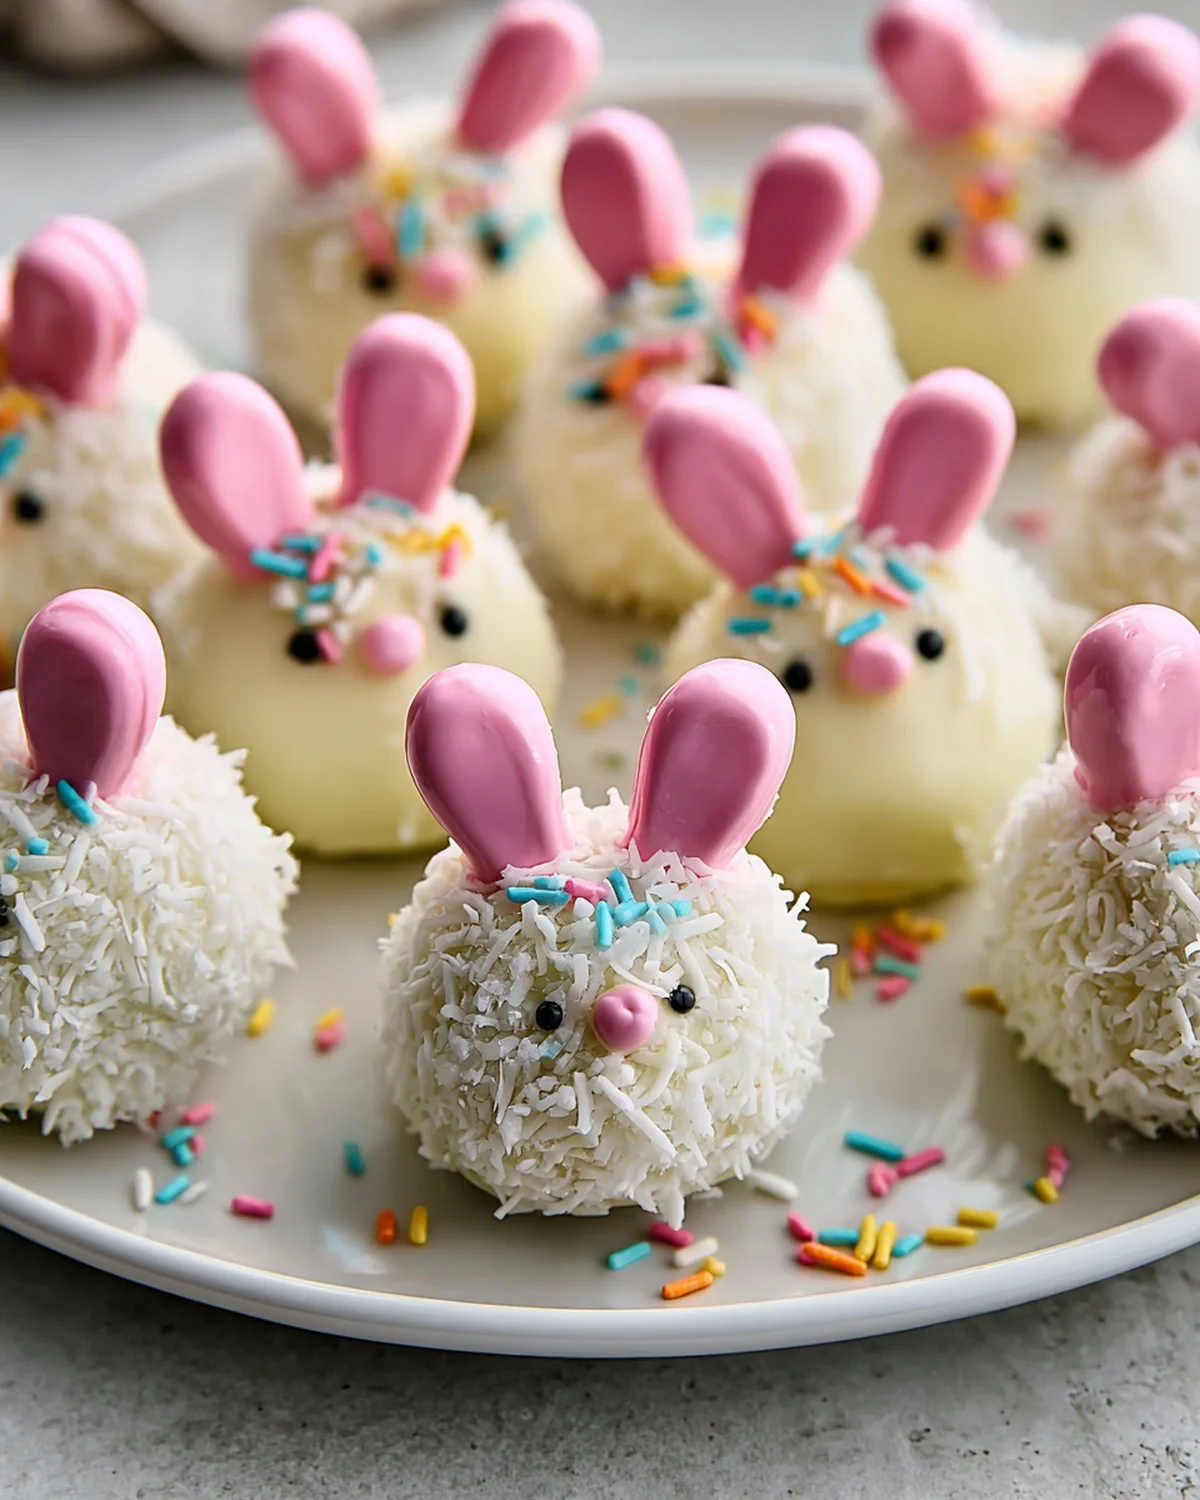
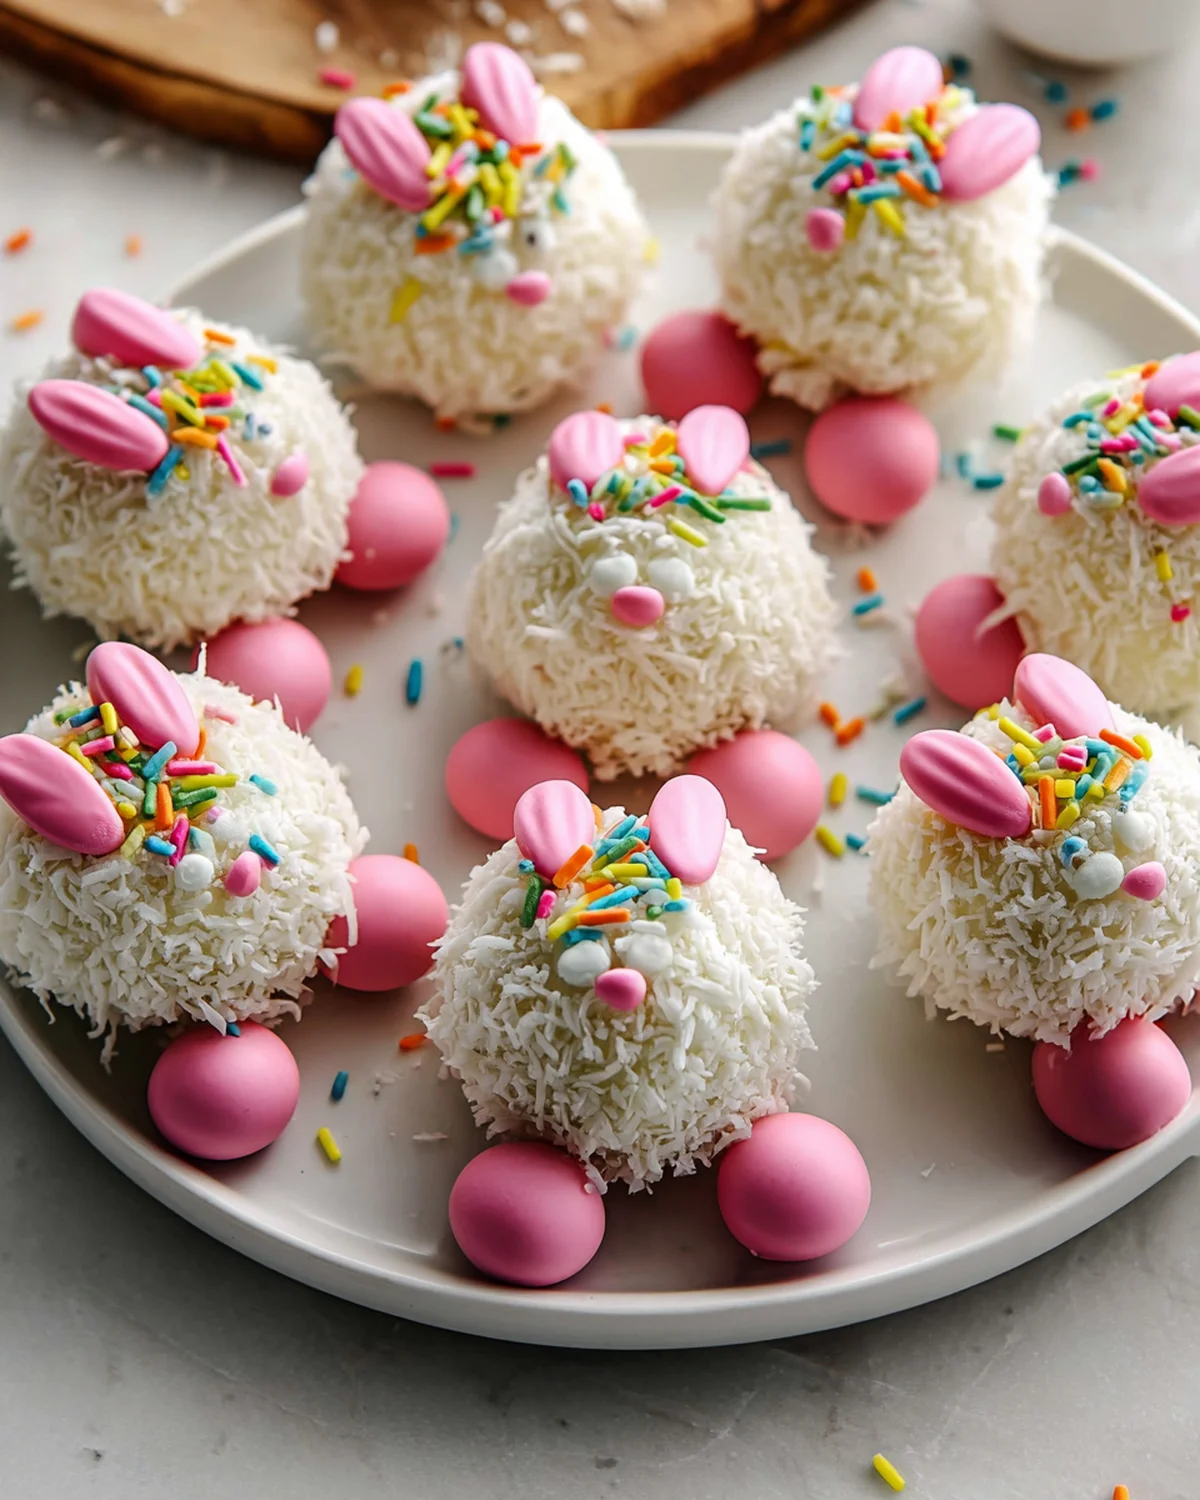
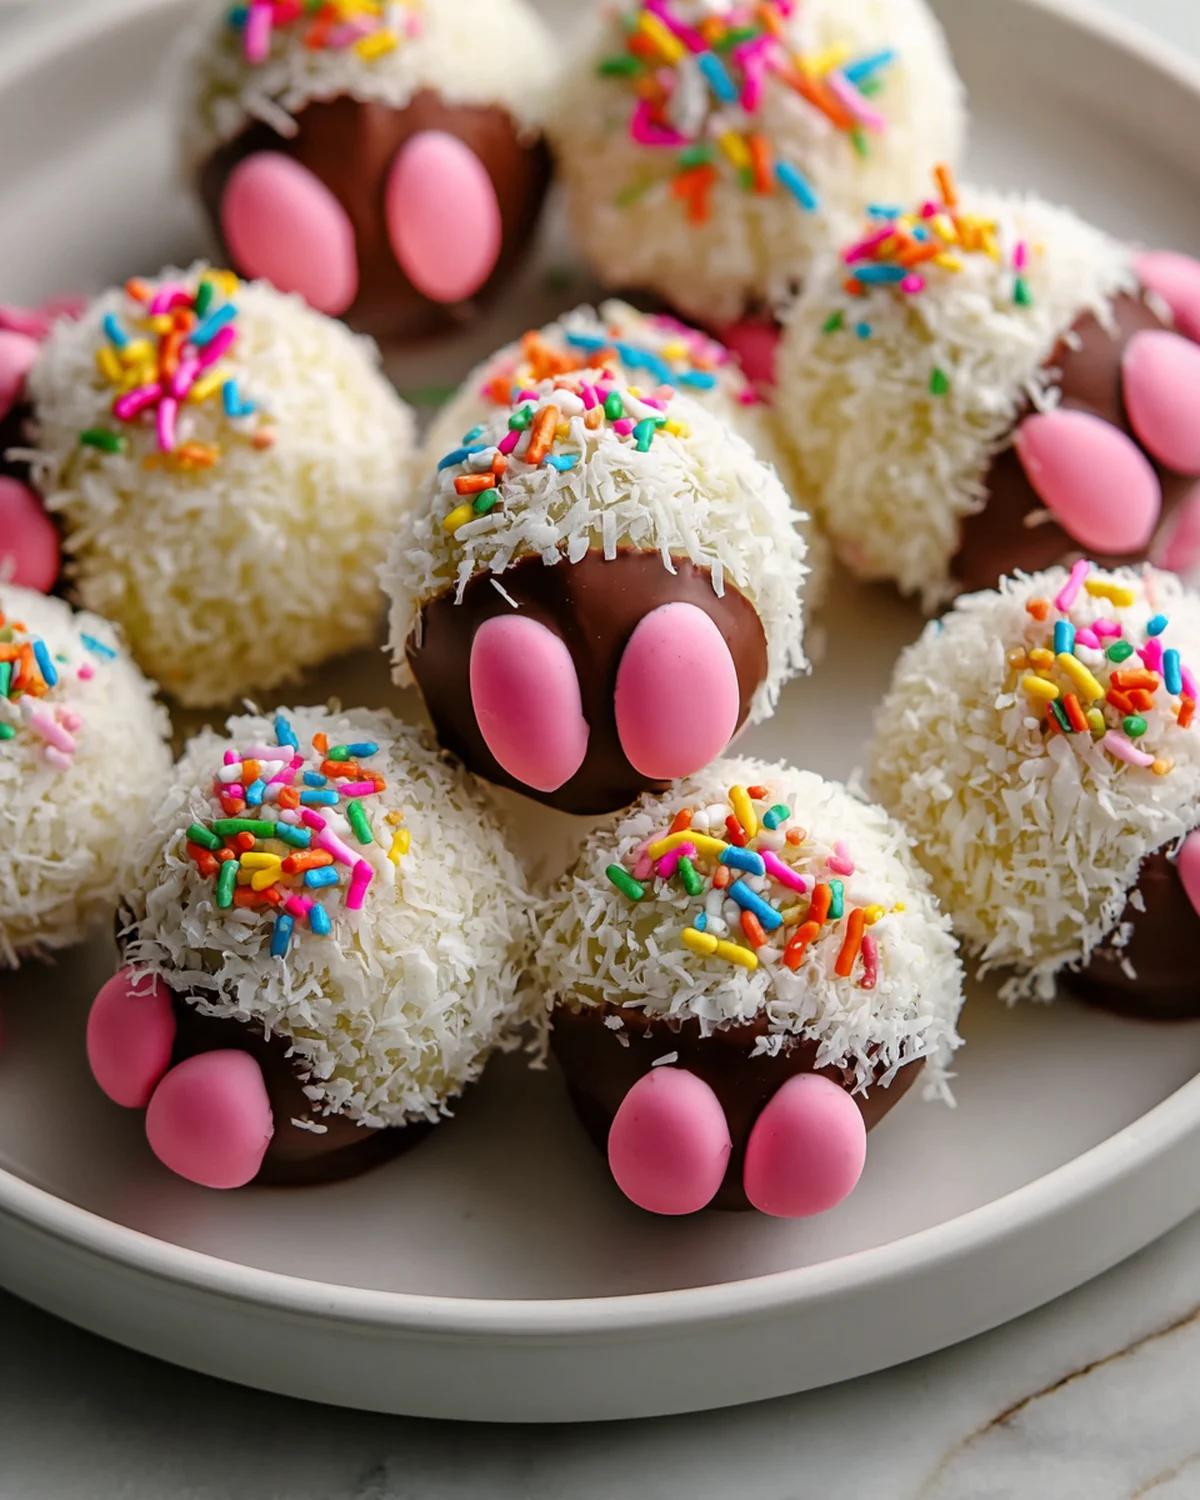
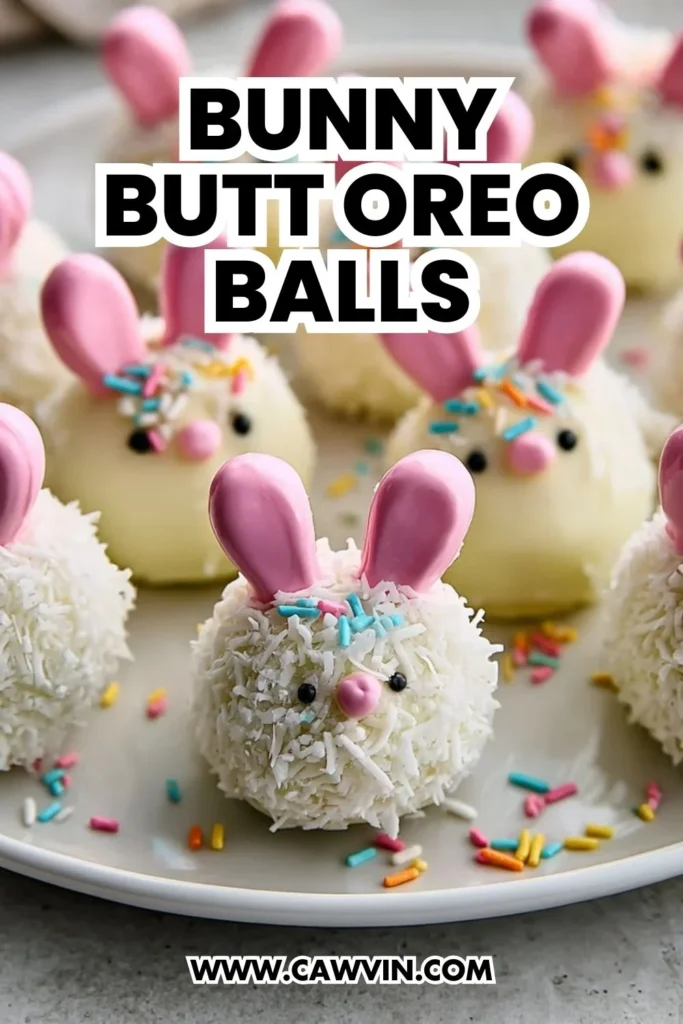
- If using, immediately sprinkle shredded coconut over the Oreo balls for a fluffy effect. The chocolate acts as an adhesive. Coconut adds a delightful texture contrast and enhances the visual appeal.
- Attach mini marshmallows or candy pearls to each Oreo ball while the chocolate is still soft—this will be the bunny tail! Press gently to secure. The marshmallow tail is both functional and fun, a sweet surprise for anyone who bites in.
- For bunny feet, melt pink candy melts and pipe small ovals onto parchment paper. Let them set. Use a small piping bag or a ziplock bag with a corner snipped off for precision. Crafty decorators can create intricate foot designs with ease.
- Once set, attach two bunny feet to each Oreo ball using a dab of melted white chocolate. Use small white chocolate chips to create little toe pads on the bunny feet. Be creative with your designs! Customize with extra sprinkles or edible glitter for added pizzazz.
- Let the Oreo balls sit at room temperature for 15 minutes or refrigerate for 10 minutes until fully set. This ensures the chocolate hardens completely. Proper setting prevents fingerprints and ensures a polished finish.
- Serve and enjoy these adorable Easter Bunny Butt Oreo Balls! They make a delightful addition to any dessert spread.
Difficulty: Easy • Cuisine: American • Preparation Time: 50 minutes • Cooking Time: 0 minutes • Total Time: 50 minutes • Calories: 180 calories • Servings: 24
Note: If you’re in a hurry, skip the bunny feet details and simply enjoy these as classic Oreo balls with a festive twist.
Health and Flavor Benefits of Ingredients
These Bunny Butt Oreo Balls not only promise delightful flavors but also come with some surprising benefits:
- Oreo Cookies: Provide a rich chocolate flavor that pairs perfectly with creamy fillings. They’re a childhood favorite that adds nostalgia to the mix. While not known for nutritional value, they offer a moment of sweet indulgence.
- Cream Cheese: Adds a tangy smoothness that balances the sweetness of the chocolate. It’s also a source of calcium and protein. Even a small amount contributes to a luxurious texture.
- White Chocolate: Offers a sweet, vanilla-like flavor that complements the Oreo base beautifully. It provides a rich and creamy consistency. Though often overlooked, white chocolate can be a delightful alternative to its darker counterparts.
- Coconut: Optional but adds a delightful texture and subtle tropical flavor. It’s a source of healthy fats and can enhance the flavor profile with its nutty sweetness. Coconut is rich in fiber, offering a little nutritional boost.
Tasty Pairings to Serve with This Easy Peasy Dish
These Bunny Butt Oreo Balls are versatile companions to various beverages and dishes, making them perfect for any occasion:
- Hot Chocolate: The rich, creamy flavor of hot chocolate enhances the sweetness of the Oreo balls, perfect for a cozy afternoon treat. Add a sprinkle of cinnamon for an extra kick. A dollop of whipped cream on your hot chocolate adds an extra layer of decadence.
- Fresh Berries: A side of fresh strawberries or raspberries provides a refreshing contrast to the richness of the Oreo balls. The tartness of the berries complements the sweet chocolate. Consider a berry compote for an elegant plating option.
- Coffee or Tea: A warm cup of coffee or tea balances the sweetness, making it a perfect pairing for adults. Opt for a light roast or herbal tea for a less intense flavor pairing. A vanilla or caramel-flavored coffee can enhance the dessert’s richness.
Storage Tips and How to Enjoy Leftovers the Easy Peasy Way
These treats store beautifully and can be enjoyed over several days. Here’s how to keep them fresh and tasty:
- Refrigerate: Store the Bunny Butt Oreo Balls in an airtight container in the refrigerator for up to a week. This keeps them firm and prevents the chocolate from melting. Place parchment paper between layers to prevent sticking. This method ensures they stay fresh and ready for impromptu snacking.
- Freeze: For longer storage, place them in a freezer-safe container and freeze for up to three months. Thaw in the refrigerator before serving. This is a great option for making them ahead of time. Freezing also allows you to prepare well in advance for Easter festivities.
- Enjoy Leftovers: Crumble leftover Oreo balls over ice cream or yogurt for a delightful dessert topping. They also make a tasty addition to a milkshake or smoothie for a sweet, creamy treat. Incorporate them into dessert charcuterie boards for a unique presentation.
As you gather with loved ones to enjoy these Bunny Butt Oreo Balls, remember that the joy of homemade cooking lies not just in the delicious results but in the shared moments and memories created along the way. Whether you’re crafting these treats for a festive Easter celebration or simply for a weekend indulgence, they’re sure to bring warmth and smiles to your kitchen.
Pin this Easy Peasy recipe!
Love this recipe? Pin the image below to your favorite Pinterest boards and bring a little Easy Peasy comfort to your kitchen whenever you need it.

Bunny Butt Oreo Balls – A Cute and Easy Easter Treat
Ingredients
Equipment
Method
- Place Oreos (including filling) into a food processor and pulse until fine crumbs form.
- Add softened cream cheese and mix until it forms a thick, sticky dough.
- Scoop about 1 tablespoon of the mixture and roll into smooth balls.
- Place on a parchment-lined baking sheet.
- Chill in the freezer for 15–20 minutes to firm up.
- Melt white chocolate or candy melts in a microwave-safe bowl in 30-second intervals, stirring between each, until smooth.
- If the chocolate is too thick, add 1 teaspoon coconut oil or vegetable shortening to thin it out.
- Using a fork or dipping tool, dip each chilled Oreo ball into the melted white chocolate.
- Tap off excess chocolate and place back onto the parchment-lined baking sheet.
- If using, immediately sprinkle shredded coconut over the Oreo balls for a fluffy effect.
- Attach a mini marshmallow or candy pearl to each Oreo ball while the chocolate is still soft—this will be the bunny tail!
- For bunny feet, melt pink candy melts and pipe small ovals onto parchment paper. Let them set.
- Once set, attach two bunny feet to each Oreo ball using a dab of melted white chocolate.
- Use small white chocolate chips to create little toe pads on the bunny feet.
- Let the Oreo balls sit at room temperature for 15 minutes or refrigerate for 10 minutes until fully set.
- Serve and enjoy these adorable Easter Bunny Butt Oreo Balls!